No edit summary |
|||
| (5 intermediate revisions by 2 users not shown) | |||
| Line 1: | Line 1: | ||
| ⚫ | |||
| − | Now, it seams, the only task is to finish assembly and test procedures. Below, I am submitting for, hopefully, your edification the documents listed above in image format. I hope the mud doesn't blur the information. |
||
| ⚫ | |||
| − | [[File:2012_11_28_P2_Cesium_Alloy_Beam_Cannon.jpg|frame|left|LIST OF MATERIALS, P2]] |
||
| + | |||
| − | [[File:2012_11_28_P3_Cesium_Alloy_Beam_Cannon.jpg|frame|left|RECOMMENDED TOOLS, P3]] |
||
| + | |||
| − | Article |
||
| + | |||
| + | |||
| + | |||
| + | |||
| + | |||
| + | |||
| + | ==Diagram Explination== |
||
| + | |||
| + | *4 Copper Tubes with flared ends (at the rear) for Air Intake. |
||
| + | *I Copper tube with flared end at the rear and installed center to the Air Intake tubes for warm air exhaust. |
||
| + | *Inside component stabilizers made of .5" thick wood and appropriate size centered holes to retain the inner components |
||
| + | *The Trigger mechanism for this design is a Nerf Handgun adapted to hold the switch and battery pack |
||
| + | |||
| + | |||
| + | '''Note:''' Depending on what particular components are available (such as the fan for example) some structural adaptations may have to be made, such as using 3" PVC or PVC adapters to accommodate your situation. An example that I ran across was when I bought the fan I am using. The frame that houses the fan is 1-9/16" in both directions, but exceeds the 2" O.D. that I need. So I will have to sand down the corners and round off the outside frame to get it to fit. Some of this is tedious. |
||
| + | |||
| + | '''# Description Qty Specifications'''== |
||
| + | |||
| + | 1.PVC Tube 1 2-3/16" OD x 2" I.D x 36" long x Sch 40 |
||
| + | 2.PVC Cap 1 2" x Sch 40 |
||
| + | 3.Copper Tubing 4 1/4" x 22" long |
||
| + | 4.Copper Tubing 1 1/4" 3" long |
||
| + | 5.Wood Stabilizer 1 1/2" thick x 2" O.D. w/ |
||
| + | center hole 1-7/16" |
||
| + | 6.Wood Stabilizer 1 1/2" thick x 2" O.D. w/ |
||
| + | center hole 1-1/2" |
||
| + | 7.Wood Stabilizer 1 1/2" thick x 2" 0 .D. w/ |
||
| + | center hole for fan. Dimension TBD |
||
| + | 8.Mirror 1 61 mm O.D. w/ center hole 1/2" I.D. |
||
| + | 9.Mirror 1 33 mm O.D. w/ center hole 1/4" I.D |
||
| + | (01' smaller) |
||
| + | 10.Fan 1 12VDC (can operate on 9V DC) |
||
| + | 11.Wine Glass, plastic 1 Come in a package of 8, |
||
| + | drill 1/8" hole in stem |
||
| + | 12.Flashlight lens and bulb 1 1-7/16" O.D. x 1-3/8" long in this |
||
| + | case the bulb holder is 1/2" O.D. |
||
| + | 13. Switch 1 Roller Lever, COM. NO, NC, |
||
| + | Momentary contact |
||
| + | 14. AA Battery Holder 1 |
||
| + | 15. 9V DC Battery 1 |
||
| + | 16. AA Battery 2 |
||
| + | 17. Paint 2(?) Color, Your Choice. |
||
| + | 18. Threaded Rods 4 1/8" X 32tpi x 24" long |
||
| + | 19. Hex Nuts 24 1/8" X 32tpi |
||
| + | 20. PVC Tube 12 1/2" I.D. X 6"long, Sch 40 |
||
| + | 21. PVC Cap 24 for item 20. use to store AA Batteries. |
||
| + | |||
| + | ===*===*===*===*===*===*===*===*===*===*===*===*===*===*===*===*===*===*===*=== |
||
| + | |||
| + | =='''Recommended Tools (to make it easier)'''== |
||
| + | |||
| + | |||
| + | '''CUTTING:''' |
||
| + | #Hack Saw |
||
| + | #Drill w 3iS" chuck |
||
| + | #Hole Saws (2", 1-112", 112") |
||
| + | #Drill Spade Bit, 5/16" |
||
| + | #Drill Bit, 1/8" |
||
| + | #Dremmel Type Tool w/cutting wheel |
||
| + | |||
| + | '''BENDING:''' |
||
| + | #Tubing Cutter |
||
| + | #Flaring Tool Kit |
||
| + | #Tubing Bender |
||
| + | |||
| + | '''ELECTRICAL:''' |
||
| + | #Small Needle Nose Piers |
||
| + | #Soldering Iron with small tip |
||
| + | #Small coil of Solder |
||
| + | |||
| + | '''MISCELLANEOUS:''' |
||
| + | #PVC Cement (small can) |
||
| + | #Rubber Cement (small can) |
||
| + | |||
| + | |||
| + | Before you go cutting, etc., taking an inventory of the parts that you have and their outside dimension or diameter (depending if their circular or not). |
||
| + | |||
| + | I had a difficult time acquiring my internal fan, but got lucky at Radio Shack at $15.00. Yes, I know, quite expensive for what I wanted to get but locating (even on line) a low DC voltage 2" cooling fan like you use in a computer is not easy, because most of the computer cooling fans are more than 2" and are 12VDC. The one I got will operate on a 9V battery. |
||
| + | |||
| + | You also need to figure out where you want to locate your battery (ies) and your switch. This determines how much wire (18-22 AWG) you need. |
||
| + | |||
| + | The Dremmel Type Tool and cutting wheel is only if you are going to adapt a Nerf gun as your Trigger Mechanism/Switch. Otherwise I see no use for it. |
||
| + | [[Category:Article]] |
||
Latest revision as of 20:25, 14 January 2013
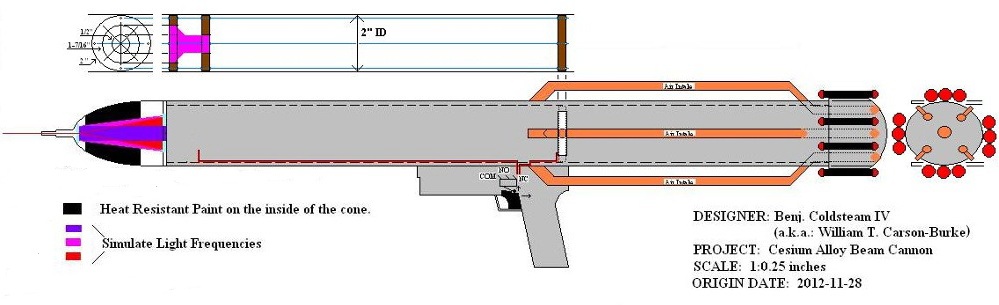
Diagram Explination[]
- 4 Copper Tubes with flared ends (at the rear) for Air Intake.
- I Copper tube with flared end at the rear and installed center to the Air Intake tubes for warm air exhaust.
- Inside component stabilizers made of .5" thick wood and appropriate size centered holes to retain the inner components
- The Trigger mechanism for this design is a Nerf Handgun adapted to hold the switch and battery pack
Note: Depending on what particular components are available (such as the fan for example) some structural adaptations may have to be made, such as using 3" PVC or PVC adapters to accommodate your situation. An example that I ran across was when I bought the fan I am using. The frame that houses the fan is 1-9/16" in both directions, but exceeds the 2" O.D. that I need. So I will have to sand down the corners and round off the outside frame to get it to fit. Some of this is tedious.
# Description Qty Specifications==
 1.PVC Tube                       1    2-3/16" OD x 2" I.D x 36" long x Sch 40
 2.PVC Cap                        1    2" x Sch 40
 3.Copper Tubing                  4    1/4" x 22" long
 4.Copper Tubing                  1    1/4" 3" long
 5.Wood Stabilizer                1    1/2" thick x 2" O.D. w/
                                       center hole 1-7/16"
 6.Wood Stabilizer                1    1/2" thick x 2" O.D. w/
                                       center hole 1-1/2"
 7.Wood Stabilizer                1    1/2" thick x 2" 0 .D. w/
                                       center hole for fan. Dimension TBD
 8.Mirror                         1    61 mm O.D. w/ center hole 1/2" I.D.
 9.Mirror                         1    33 mm O.D. w/ center hole 1/4" I.D
                                       (01' smaller)
10.Fan                            1    12VDC (can operate on 9V DC)
11.Wine Glass, plastic            1    Come in a package of 8,
                                       drill 1/8" hole in stem
12.Flashlight lens and bulb       1    1-7/16" O.D. x 1-3/8" long in this
                                       case the bulb holder is 1/2" O.D.
13. Switch                        1    Roller Lever, COM. NO, NC,
                                       Momentary contact
14. AA Battery Holder             1
15. 9V DC Battery                 1
16. AA Battery                    2
17. Paint                         2(?) Color, Your Choice.
18. Threaded Rods                 4    1/8" X 32tpi x 24" long
19. Hex Nuts                     24    1/8" X 32tpi
20. PVC Tube                     12    1/2" I.D. X 6"long, Sch 40
21. PVC Cap                      24    for item 20. use to store AA Batteries.
*===*===*===*===*===*===*===*===*===*===*===*===*===*===*===*===*===*===*[]
Recommended Tools (to make it easier)[]
CUTTING:
- Hack Saw
- Drill w 3iS" chuck
- Hole Saws (2", 1-112", 112")
- Drill Spade Bit, 5/16"
- Drill Bit, 1/8"
- Dremmel Type Tool w/cutting wheel
BENDING:
- Tubing Cutter
- Flaring Tool Kit
- Tubing Bender
ELECTRICAL:
- Small Needle Nose Piers
- Soldering Iron with small tip
- Small coil of Solder
MISCELLANEOUS:
- PVC Cement (small can)
- Rubber Cement (small can)
Before you go cutting, etc., taking an inventory of the parts that you have and their outside dimension or diameter (depending if their circular or not).
I had a difficult time acquiring my internal fan, but got lucky at Radio Shack at $15.00. Yes, I know, quite expensive for what I wanted to get but locating (even on line) a low DC voltage 2" cooling fan like you use in a computer is not easy, because most of the computer cooling fans are more than 2" and are 12VDC. The one I got will operate on a 9V battery.
You also need to figure out where you want to locate your battery (ies) and your switch. This determines how much wire (18-22 AWG) you need.
The Dremmel Type Tool and cutting wheel is only if you are going to adapt a Nerf gun as your Trigger Mechanism/Switch. Otherwise I see no use for it.